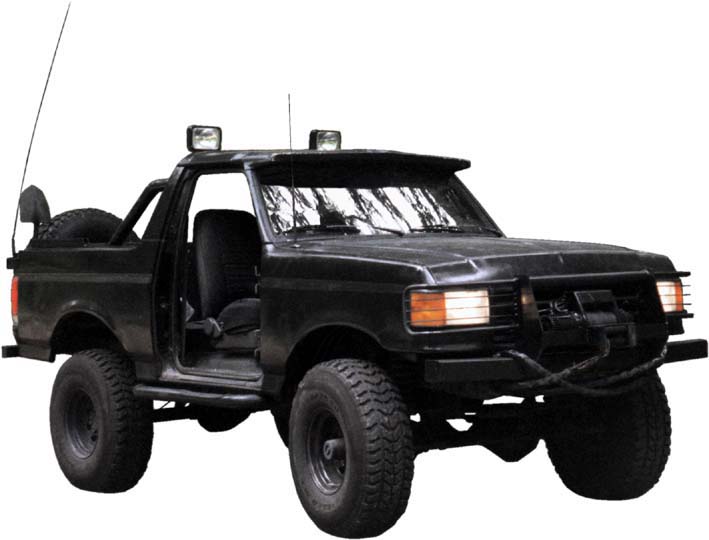
Ford Bronco Onboard Welding
Welder
http://www.laurels.com/dcmeter.htm
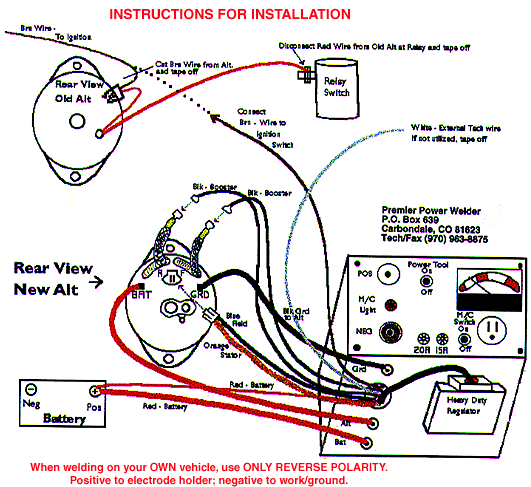
IMPORTANT--Find the ignition wire from the old harness -- splice it to our BROWN wire. Take all other wires from the old harness and tape them up and tie them off somewhere. DO NOT attach any of these to the new alternator.
160 AMP
|
ROTOR RPM |
AMPS @ 13.5 VOLTS |
|
|---|---|---|
|
2000 |
87 |
67 |
|
2500 |
117 |
97 |
|
3000 |
130 |
110 |
|
3500 |
136 |
116 |
|
4000 |
141 |
121 |
|
4500 |
145 |
125 |
|
5000 |
148 |
128 |
|
5500 |
150 |
130 |
|
6000 |
152 |
132 |
|
6500 |
153 |
133 |
|
7000 |
160 |
140 |
PPW-supplied 25' heavy-gauge cables
The ground cable has a heavy duty ground clamp and the hot cable has a high quality rod holder
Welding Operation:
To weld, you need to do the following:
Get the engine running at idle
Plug in your welding cables
Turn on the Master Control switch and flip the booster switch to Hi-Weld
This must be done at idle
Then crank up the engine RPMs until the volt meter reads the proper open circuit voltage (OCV) for the type of welding you are going to do
45V for 3/32" rod
55V for 1/8" rod, etc.
Then connect the ground clamp to the object to be welded
Stick a rod in the holder and strike an arc
After you finish welding, do the above steps in reverse order:
Drop the engine speed back to idle
Disconnect the welding cables
Turn off the booster and master control switches (must be done at idle)
When welding on your OWN vehicle, use only REVERSE
POLARITY. Positive to electrode holder; Negative to work/ground.
Never weld on your own vehicle with your Premier Power Welder in straight
polarity. Also do not weld with Ready Welder or any other unit using
straight polarity wire, on your own vehicle.
IMPORTANT!!
REMEMBER TO SHUT DOWN YOUR PREMIER IN REVERSE SEQUENCE: THROTTLE DOWN
FIRST, THEN TURN OFF THE MASTER SWITCH AND BOOSTER (OR POWER-TOOL SWITCH).
FAILURE TO DO SO MAY RESULT IN THE SOLENOID IN THE BOX STICKING AND NOT
ALLOWING THE UNIT TO SWITCH BACK INTO THE CHARGING MODE. IF THIS HAPPENS,
TAKE THE TOP OFF AND TAP ON THE SOLENOID WITH SOMETHING, THEN PUT IT BACK
TOGETHER.
Remember: You have three hours of welding/ power-outlet use maximum (if you have a new battery) without recharging. To minimize this loss, whenever your unit is not in use, turn the master switch OFF. This will put you into "charge" mode and keep your battery charged, which will give you more welding time.
Power Tool Operation:
To set up for 115V operation, do the following:
Get the engine running at idle
Turn on the Master Control and Power Tool switches (must be done at idle)
Then crank up the engine RPMs until the volt meter reads 115V DC
Then plug in the power tool and go
Shutdown in the opposite order, as in welding
Welding Rod Numbers Decoded
Typical arc welding rod has a part number like: E6010 or a
fancy one is E8018-B1-H4R.
Peterson's 4-Wheel & Off-Road November 2002 states:
Pat Gremillion of Premier Power Welder recommends using a 6011 rod in the 3/32 inch size to get the feel for your welder.
AWS Classifications Explained
The American Welding Society (AWS) numbering system can tell a welder
quite a bit about a specific stick electrode including what application it
works best in and how it should be used to maximize performance. With that
in mind, let's take a look at the system and how it works.
The prefix "E" designates an arc welding electrode. The first two digits
of a 4-digit number and the first three digits of 5-digit number indicate
tensile strength (typical vales are 60,70,80,90,100,110). For example,
E6010 is a 60,000 psi tensile strength electrode while E10018 designates a
100,000 psi tensile strength electrode. To figure out the strength
of the weld, take the 2 digits, in this case 60, and multiply by 1000 to
get the weld strength in PSI.
|
E |
60 |
1 |
"10" |
|
Electrode |
Tensile strength |
Position |
Type of Coating and Current |
The 3rd digit tells you what position the rod is recommended for.
1 : Flat, Horizontal, Vertical, Overhead.
2 : Flat and Horizontal only.
3 : Flat, Horizontal, Vertical Down, Overhead.
Peterson's 4-Wheel & Off-Road November 2002 states (which seems to be inaccurate):
1 All positions (flat, horizontal, vertical, overhead)
2 horizontal and flat
3 flat only
The last two digits tells you about welding current and the coating.
Digit
Type of Coating
Welding Current
10
High cellulose sodium
DC+
11
High cellulose potassium
AC or DC+ or DC-
12
High titania sodium
AC or DC-
13
High titania potassium
AC or DC+
14
iron power titania
AC or DC- or DC+
15
low hydrogen sodium
DC+
16
low hydrogen potassium
AC or DC+
27
iron powder iron oxide
AC or DC+ or DC-
18
iron powder low hydrogen
AC or DC+
20
High iron oxide
AC or DC+ or DC-
22
High iron oxide
AC or DC-
24
iron powder titania
AC or DC- or DC+
28
Low hydrogen potassium iron powder
AC or DC+
The rod + will give deeper penetration, and the rod - will give faster deposition.
Peterson's 4-Wheel & Off-Road November 2002 states:
Unless you are an experienced stick welder, stick with rods that end in either 1 or 3 since these will work in either AC or DC currents and straight or reversed polarity.
If there is a letter and number combination next, it relates to the chemical composition of the weld deposit.
Ni
Cr
Mo
Mn
V
A1
0.5%
B1
0.5%
0.5%
B2
1.25%
0.5%
B3
2.25%
1%
C1
2.5%
C2
3.25%
C3
1%
0.35%
D1
0.15%
0.25-0.45%
1.25-2%
D2
0.25-0.45%
1.25-2%
G
0.5%
>0.3%
>0.2%
>0.1%
* (G only needs one of the elements listed)
Next part is a H#. This relates to the maximum amount of hydrogen that will be diffused from the rod.
A trailing R means that the rod is moisture resistant.
As a welder, there are certain electrodes that you will most likely see and use time and time again as you go about your daily operations. A DC machine produces a smoother arc. DC rated electrodes will only run on a DC welding machine. Electrodes which are rated for AC welding are more forgiving and can also be used with a DC machine. Here are some of the most common electrodes and how they are typically used:
E6010
DC only and designed for putting the root bead on the inside of a piece of
pipe, this is the most penetrating arc of all. It is tops to dig through
rust, oil, paint or dirt. It is an all-position electrode that beginning
welders usually find extremely difficult, but is loved by pipeline welders
world-wide. Lincoln 5P+ sets the standard in this category.
E6011
This electrode is used for all-position AC welding or for welding on
rusty, dirty, less-than-new metal. It has a deep, penetrating arc and is
often the first choice for repair or maintenance work when DC is
unavailable. The most common Lincoln product is Fleetweld® 180 for hobby
and novice users. Industrial users typically prefer Fleetweld 35.
E6013
This all-position, AC electrode is used for welding clean, new sheet
metal. Its soft arc has minimal spatter, moderate penetration and an
easy-to-clean slag. Lincoln Fleetweld® 37 is most common of this type.
E7018
A low-hydrogen, usually DC, all-position electrode used when quality is an
issue or for hard-to-weld metals. It has the capability of producing more
uniform weld metal, which has better impact properties at temperatures
below zero. The Lincoln products are typically Jetweld® LH-78 or our new
Excalibur® 7018.
E7024
Typically used to make a large weld downhand with AC in plate that is at
least ¼" thick, but more commonly used for plate that is ½" and up.
Lincoln has several electrodes in this category that are called Jetweld®
1, 2, or 3.
Other Electrodes
Although not nearly as common, an electrode may have additional numbers
after it such as E8018-B2H4R. In this case, the "B2" indicates chemical
composition of the weld metal deposit. The "H4" is the diffusible hydrogen
designator, which indicates the maximum diffusible hydrogen level obtained
with the product. And "R" stands for the moisture resistant designator to
indicate the electrode's ability to meet specific low moisture pickup
limits under controlled humidification tests.
Please feel free to link to this site so that others can find it. It's easy to link to this site, just copy one of the texts below onto your web page:
Copyright © 2000-2014
